You know how glitter is so pretty and sparkley and it just mesmerizes you?
Yep. That just happened.
I am often impressed by how good of photos I can take with an ipad. Seriously.
This is from the Kiss nails gradation trio. It is called Exposure. It is a gold glitter gradient kit with the last layer also having some large holo glitters in them. They have a pink, gray, and blue according to the website but I didn't see the blue when I was at the store last time. Its probably too popular. Or my Walmart makeup section is too busy looking like a war zone. I want the other colors though.
I also used a new to me top coat from Poshe. Totally in love with it. This wore for 4 days before I wore enough off at the ends, I decided to switch colors.
But let me tell you. Removal was TERRIBLE. I couldn't find my acetone and used non-acetone remover which took FOREVER with a glitter polish.So, always, always use 100% acetone for glitter polish. Non-acetone just doesn't soak off very well.
So yeah, $6-7 range for a trio. Super easy. Super fun. Available at Walmart, Target, I think you can even get them at Walgreens and the like. Get 100% acetone for removal and save yourself heartache. (a rule for glitter that I ignored and suffered!)
P.S. Wondering about my peely sad nails? This post is from before the Essie nail wraps. So, any sad nails are literally just my genes. ;)
Showing posts with label glitter. Show all posts
Monday, October 20, 2014
Tuesday, June 4, 2013
Maybelline Sandstrom and Hard Candy Black Tie Optional
Its summer! My laptop is fixed!
The kids and I have no been adjusting so well to a rainy beginning of summer (read TICKS!!! ewwww, and lots of messes, and no time for school), so I have had a little drugstore retail therapy this week. I got a few Maybelline limited edition polishes and knocked off a lemming with Hard Candy Black Tie Optional.
Maybelline Sandstorm is a light tan/beige cream. The first coat was pretty streaky, but the second coat left me with a perfect background for glitter. What? you don't look at neutral shades as great backgrounds for glitter? You poor dears.
Enter my lemming. To be fair my lemming was a black and white glitter top coat. I have decided I am not that into indie polishes in general. The ones I have I really like, but I just like walking into a store and walking out with polish. Its more exciting. I missed the China Glaze black and white glitter a few months ago, and HC Black Tie Optional has been sold out at most of the stores I have been to until Thursday afternoon. In a stressful store trip to buy paper towels for mess cleaning and Oreos for 'positive behavior reinforcement' I went down the nail polish aisle. And it was there. Actually they had more than one of every color in the display. But, I only walked away with black tie optional. *pat on the back*
It went on like a dream. I only needed one coat for this coverage. My other hand I applied the top coat a little thicker and I didn't like it as much.
I love this manicure! Its fun and still classy. I will totally wear this again. It chipped on the second day, but I was helping someone move in, so that manicure got a workout. (And hey no nails chipped so wohoo!)
Maybelline limited edition polishes run for $3 at Walmart. The Hard Candy polishes were all $4. I buy all my polishes myself. With cash too, like a responsible budget following person. Or like someone not leaving a paper trail. You decide.
The kids and I have no been adjusting so well to a rainy beginning of summer (read TICKS!!! ewwww, and lots of messes, and no time for school), so I have had a little drugstore retail therapy this week. I got a few Maybelline limited edition polishes and knocked off a lemming with Hard Candy Black Tie Optional.
Maybelline Sandstorm is a light tan/beige cream. The first coat was pretty streaky, but the second coat left me with a perfect background for glitter. What? you don't look at neutral shades as great backgrounds for glitter? You poor dears.
Enter my lemming. To be fair my lemming was a black and white glitter top coat. I have decided I am not that into indie polishes in general. The ones I have I really like, but I just like walking into a store and walking out with polish. Its more exciting. I missed the China Glaze black and white glitter a few months ago, and HC Black Tie Optional has been sold out at most of the stores I have been to until Thursday afternoon. In a stressful store trip to buy paper towels for mess cleaning and Oreos for 'positive behavior reinforcement' I went down the nail polish aisle. And it was there. Actually they had more than one of every color in the display. But, I only walked away with black tie optional. *pat on the back*
It went on like a dream. I only needed one coat for this coverage. My other hand I applied the top coat a little thicker and I didn't like it as much.
I love this manicure! Its fun and still classy. I will totally wear this again. It chipped on the second day, but I was helping someone move in, so that manicure got a workout. (And hey no nails chipped so wohoo!)
Maybelline limited edition polishes run for $3 at Walmart. The Hard Candy polishes were all $4. I buy all my polishes myself. With cash too, like a responsible budget following person. Or like someone not leaving a paper trail. You decide.
Monday, December 24, 2012
Different DImension "I've Been an Angel All Year"
Sorry this is a little later in the day than usual, I haven't found my nail polish groove again. But I wanted to share my Christmas manicure. Well I might swap colors since I have another polish I haven't tried out yet, but as of right now, this is what I will be wearing tomorrow.
And even though its Christmas Eve, its just another day in our house. The husband is at work, we are dropping off food for LINK's Christmas Eve dinner. Link is the Lawrence Interdenominational Nutrition Kitchen. Its housed by the church directly across the street from the homeless shelter, and our church usually is responsible to serve 4 times a year, as well as helping with the holidays. This year we are doing Christmas Eve dinner.
Anyway onto the nails!
"I've been an Angel All Year" is a milky white base with white, silver, and blue (matte and sparkly) glitters. Its pretty, and not totally "Christmas" so I can wear it all winter. Funnily enough my other seasonal collection color IS totally christmas (red and green glitter bomb) so if I end up with another post this week sporting holiday nails, you all know why.
Also, sorry for the cuticles, i ran out of orange oil and its not coming until the post Christmas clearance at Sally's. And I bumped my nails so there is a dent in the middle finger. I don't mind it, so its staying.
Like, love it? Want some more of it? I bought this from Different Dimension's etsy shop. As of this post she had a 20% off code (good until the 26th), so you can get your own for 20% off $8.50. She also has the option for overnight shipping including Saturday delivery if you NEED this for a New Year's party.
Now I am off to be domestic and super crafty awesome mommy (or at least to hand out cookie bribes and turn on Charlie Brown Christmas Special). I hope you all have a great holiday!
And even though its Christmas Eve, its just another day in our house. The husband is at work, we are dropping off food for LINK's Christmas Eve dinner. Link is the Lawrence Interdenominational Nutrition Kitchen. Its housed by the church directly across the street from the homeless shelter, and our church usually is responsible to serve 4 times a year, as well as helping with the holidays. This year we are doing Christmas Eve dinner.
Anyway onto the nails!
"I've been an Angel All Year" is a milky white base with white, silver, and blue (matte and sparkly) glitters. Its pretty, and not totally "Christmas" so I can wear it all winter. Funnily enough my other seasonal collection color IS totally christmas (red and green glitter bomb) so if I end up with another post this week sporting holiday nails, you all know why.
Also, sorry for the cuticles, i ran out of orange oil and its not coming until the post Christmas clearance at Sally's. And I bumped my nails so there is a dent in the middle finger. I don't mind it, so its staying.
Like, love it? Want some more of it? I bought this from Different Dimension's etsy shop. As of this post she had a 20% off code (good until the 26th), so you can get your own for 20% off $8.50. She also has the option for overnight shipping including Saturday delivery if you NEED this for a New Year's party.
Now I am off to be domestic and super crafty awesome mommy (or at least to hand out cookie bribes and turn on Charlie Brown Christmas Special). I hope you all have a great holiday!
Wednesday, November 14, 2012
LynBDesigns Zero
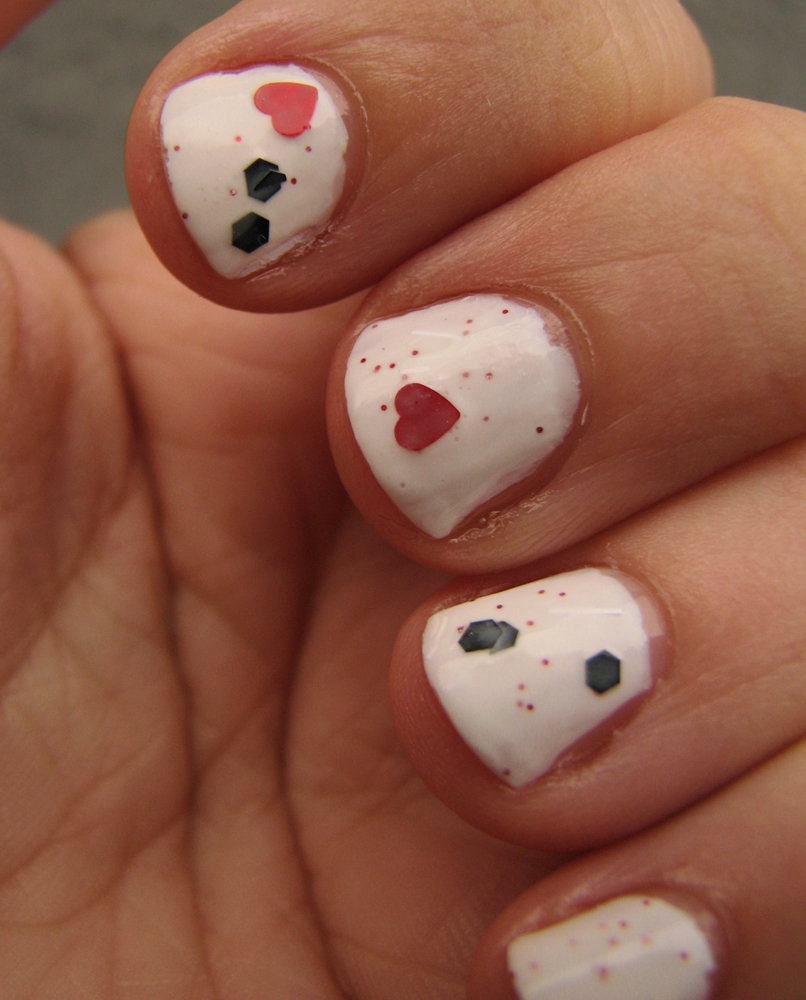
Zero from LynBDesigns is from the Nightmare Before Christmas collection. If you have been living under a rock, Nightmare Before Christmas an animated cartoon that shows what happens if Halloween Town ran Christmas instead of the North Pole. Zero is the dog of the main character and he is a little ghost dog with a red nose.
Zero is a milky white base with big hearts, medium black hexes, white rectangle polishes, tiny red flecks, and a few sheer large hearts.
You can get full coverage in 3 coats. To get sufficient glitter coverage for me (I love my glitter) I needed 2 coats over a base. I tried this with some colored bases, but by the time I had as much glitter as I wanted the base color was pretty well hidden. Also, you will be fishing for bigger glitters if you want more of them. To me that is part of life with big glitter polishes. I didn't end up fishing too much though.
I ended up wearing this over Orly's Dayglow. This is 2 coats of Zero
over 2 coats of Orly Dayglow. The ring finger used to have a contrast
color with Zero over it, but that didn't work out, so I quickly
replicated the other nails. And as you can see I bumped it and got a
couple of creases before it was totally dry. No worries though, I got my
regular wear from the polish. I do tend to change my color every couple
of days, so its not extended wear, but it did well for me. Nothing that
my usual base/top coat couldn't handle.
Also using white as the base means you can't see the white bar glitter or the clear hearts. They are both there. In fact you can't see it probably but there is even a clear heart on one of these finger. Its like where's waldo for nail polish. :-P
Disclaimer, I bought all polishes used in this manicure and all opinions are my own.You can buy Zero from LynBDesigns on Etsy. Follow her on Facebook for special promos and discount codes. Orly can be bought at most beauty suppliers. This white came in the summer neon collection. As you can probably tell by now its one of my faves under glitter polishes.
Friday, November 9, 2012
Lancome Mystery polish
Ready for a no-name mystery polish mani? Here it is! This is Lancome mystery in a warm gray shade. Its not on Lancome's website, and the bottle shape is different. Its a mini size (8ml).
I got it in a blog sale mystery box, so it likely is an older bottle style or possibly was part of a kit/set since it a small size.
Its shown with a freebie mini from Kawaii Nail Lacquer on the ring finger. I didn't realize the Kawaii was so orange and black until it was on the nail. The orange glitters change to red plus there are purple to blue holo glitters so it can be deceiving at certain angles. I thought it would be more rainbow of a glitter, its not. Its nice, but felt a little Halloween to me. If it wasn't the week after Halloween I wouldn't think Halloween so hard.
Above is in the shade and morning sun. Its also after 24 hours of wear. It wore really well considering I didn't wrap the tips. Oops!
Here are the bottle shots. Looking at this photo I don't know why I didn't think the Kawaii would be orange, black and white. Sometimes I just don't really think before applying polish.
Disclosure: I buy all my polishes. The Lancome is one of those random not made anymore things. You can buy other colors online or in select department stores. The Kawaii was a freebie with purchase. She runs specials like this on occasion. Check out her Facebook page for flash sales and deal alerts.
I got it in a blog sale mystery box, so it likely is an older bottle style or possibly was part of a kit/set since it a small size.
Its shown with a freebie mini from Kawaii Nail Lacquer on the ring finger. I didn't realize the Kawaii was so orange and black until it was on the nail. The orange glitters change to red plus there are purple to blue holo glitters so it can be deceiving at certain angles. I thought it would be more rainbow of a glitter, its not. Its nice, but felt a little Halloween to me. If it wasn't the week after Halloween I wouldn't think Halloween so hard.
Above is in the shade and morning sun. Its also after 24 hours of wear. It wore really well considering I didn't wrap the tips. Oops!
Here are the bottle shots. Looking at this photo I don't know why I didn't think the Kawaii would be orange, black and white. Sometimes I just don't really think before applying polish.
Disclosure: I buy all my polishes. The Lancome is one of those random not made anymore things. You can buy other colors online or in select department stores. The Kawaii was a freebie with purchase. She runs specials like this on occasion. Check out her Facebook page for flash sales and deal alerts.
Wednesday, November 7, 2012
Pomegranate Nail Lacquer Autumnesque
Still got the sickies around here. Boo. But I got the replacement part for the carpet cleaner so I have been a busy little bee cleaning house today. Yay! And I have been wearing s SUPER pretty color too.
Autumnesque by Pomegranate Nail Laquer is a mauve shade with gold shimmer in it. The website calls is 'copper' but clearly they are using that term loosely since I call it pink. Its more of a brown autumnal shade of rose pink IMO.
It is a thinner formula than some, but not lacking in pigment. This was 2 coats and I might have even pulled off only 1 coat on short nails. One thing I have to say (mostly to myself) is wrap the tips. I did not, and the top coat shrunk the polish a little and there is little lines of white sticking out the end on several fingers.
If this brand is unfamiliar, its because its pretty small still and semi-indie at this point. Their polish is: made in the USA;"4-free" - Contain NO toluene, formaldehyde, dibutyl phthalate (DBP) or camphor; and not tested on animals. So lots of good things there. The formula reminded me a lot of Zoya (which is 5 free, so a similar idea). The only thing I did not like was the brush. It was very thin. It took me 5 or 6 strokes to do the width of my thumb and middle finger nails. I guess it would be great for children's nails or people with really tiny nails. If you have really big ones though, the brush size might be annoying to you.
On the pinky finger I have Burning Leaves from LynBDesigns (freebie for the month of October with large purchase woot woot!) I used some thick top coat to tame the gritty glitter. I actually didn't like burning leaves on Autumnesque as much as I thought I would. Burning leaves is a gold/orange glitter bomb and it didn't go as well with the pink of Autumnesque as I initially expected. Not bad enough to remove the polish and try again, but I won't repeat the combo. A more true gold would look better than the orange and gold IMO. Then again you all might love the combination.
Disclaimer, I bought all polishes my self (technically Burning Leaves was a freebie with purchase, but I was not sent polish to review). All opinions are my own. If you want to try these polishes Pomegranate Nail Lacquer retails for $9 for a full size bottle and can be bought at http://www.pomegranatelacquer.com/ It is also part of their holiday Gift Set, which I want even though I have the color. See their website for more locations. LynBDesigns retails for $8.50 and while this polish cannot be bought, you can buy other polishes from her in her etsy store.
Autumnesque by Pomegranate Nail Laquer is a mauve shade with gold shimmer in it. The website calls is 'copper' but clearly they are using that term loosely since I call it pink. Its more of a brown autumnal shade of rose pink IMO.
It is a thinner formula than some, but not lacking in pigment. This was 2 coats and I might have even pulled off only 1 coat on short nails. One thing I have to say (mostly to myself) is wrap the tips. I did not, and the top coat shrunk the polish a little and there is little lines of white sticking out the end on several fingers.
If this brand is unfamiliar, its because its pretty small still and semi-indie at this point. Their polish is: made in the USA;"4-free" - Contain NO toluene, formaldehyde, dibutyl phthalate (DBP) or camphor; and not tested on animals. So lots of good things there. The formula reminded me a lot of Zoya (which is 5 free, so a similar idea). The only thing I did not like was the brush. It was very thin. It took me 5 or 6 strokes to do the width of my thumb and middle finger nails. I guess it would be great for children's nails or people with really tiny nails. If you have really big ones though, the brush size might be annoying to you.
On the pinky finger I have Burning Leaves from LynBDesigns (freebie for the month of October with large purchase woot woot!) I used some thick top coat to tame the gritty glitter. I actually didn't like burning leaves on Autumnesque as much as I thought I would. Burning leaves is a gold/orange glitter bomb and it didn't go as well with the pink of Autumnesque as I initially expected. Not bad enough to remove the polish and try again, but I won't repeat the combo. A more true gold would look better than the orange and gold IMO. Then again you all might love the combination.
Disclaimer, I bought all polishes my self (technically Burning Leaves was a freebie with purchase, but I was not sent polish to review). All opinions are my own. If you want to try these polishes Pomegranate Nail Lacquer retails for $9 for a full size bottle and can be bought at http://www.pomegranatelacquer.com/ It is also part of their holiday Gift Set, which I want even though I have the color. See their website for more locations. LynBDesigns retails for $8.50 and while this polish cannot be bought, you can buy other polishes from her in her etsy store.
Monday, November 5, 2012
LynBDesigns The Man with Two Hearts
'The Man with Two Hearts' from LynBDesigns is part of her "The Doctor is in" collection. Its a red glitter with small square glitters and two shades of red heart glitters. The hearts hide in multiple layers of the glitter since they are the same shade. I did my thumb with two layers of THwTH below. I topped it with a generous layer of P.D. Quick Top coat by Butter London since it dried a little gritty textured. The rough glitter texture was not as noticeable with only one layer, so when used as a topper any top coat will work. If you layer this up use a top coat specific for thirsty glitter or thick layers of good quality top coats. For a super smooth finish you might want a second thicker layer of top coat, but I was happy with just one.
The color was ok on its own, but I decided I wanted to try it over a red. The red was of course OPI's The Color of Minnie. Its my favorite red and I can't find one that I love as much on my hands. So here is one coat of TMwTH over red.
I LOVE LOVE LOVE it as a topper. I didn't fish for heart glitters, so they were pretty sparse and I only ended up with one on the nails. You can't see them as well on the thumb photo (at top) but there were two in there. It was party because I applied thicker coats using more of a dab method. The fingers I just brushed the glitter on leaving thinner layers of polish.
This was a thinner formula than the Medusa Cascade I previously reviewed. I believe Medusa Cascade uses more of a gel base polish and The Man with Two Hearts was more of a regular polish base, if that makes any sense. So for me Medusa Cascade really wanted to be dabbed on, but this can be brushed on easily. Your mileage may vary, but this was my experience.
I think I just found my performance manicure. I have a solo (for 2 measures and 1 beat haha!) in John Rutter's Gloria this Christmas Season. We are supposed to wear holiday outfits. Of course that means Diva red.
Disclaimer: All polishes are bought by me and all opinions are my own. LynBDesigns retails for $8.50 for a full size bottle including shipping. Check her out on Etsy. OPI retails for $8.50 and can be found at select salons including JCPenny Salons among others. Find a reputable retailers on opi.com.
Monday, October 29, 2012
LynBDesigns Medusa Cascade
Glitter bomb. Oh yes.
Medusa Cascade is from "The Doctor is In" collection by LynBDesigns. Its a fabulous top coat and could even be a stand alone polish. This is newly formulated, and I never tried the old version so I don't know what the differences could be.
And check out that font on the bottle label. Yeah this fan girl approves.
The clear base is slightly blue tinted so it will tint whatever you layer it over. I got full coverage with 3 coats, so if you want an intense glitter bomb nail without the wait time of a base color, go for it.
I tried this layered over white and just plain and I really liked the pop the white gave it. It sort of makes the polish glow from within. I am sure it would look nice with a darker base as well. My base color is Orly's Dayglow which was marketed to make neons pop, and it does great under glitter toppers as well IMO. If you have tried this base coat and hate the streaks, you are using too thin of coats. Make them thicker and you will have less issues with streaks. And no, thinner doesn't solve that problem, its just really a white that wants to be put on thickly and left to dry fully. I did 3 min between coats first try though and then ruined the nails before pics when changing a diaper. The glitter was dry when I bumped it and it literally slid off the white. Do a full 5+ minutes for dry time for each layer of Dayglow. Just trust me on this.
And back to the sparkles.
This is 1 layer on the pinky and ring fingers, 2 layers on pointer and middle. The glitter does sort of want to do the dab technique application, so that is what I did for most of the fingers. The ring finger I actually just brushed it on though. Still a nice look, but I could see needing more coats for complete coverage if you do it this way.
The glitter died a little bumpy, but not gritty. Actually it dried about as bumpy as some glitters do WITH a generous top coat so I was really happy with it. A top coat made it completely smooth.
Click on the photos to zoom in. You know you want to see the rainbow holographic action going on. There are tiny glitters that are holographic as well as the bar glitters and some of the stars. There are silver rainbow holo stars and some dark blue stars that turn green to blue to purple. The light blue stars are matte.
This one has a bit of the color washed out because it was in the clouds. They have been rolling through all day and its been variations of sun and bright but no sun, and dim cloudy.
I love this color! Seriously. I tested out the polish for opacity and then reapplied it twice thanks to a diaper fiasco and I still don't want to take it off. I didn't even get annoyed that I had to apply it again because its so dang pretty. Oh and because I used a glue base coat so at least it was fast and easy between applications. I also admit after testing application on one fingernail I went back and bought more. What can I say, I really like them!
LynBDesigns nail polish retails for $8.50 including shipping to the US. Yes seriously! I believe she only sells polish within the states, but she sells lip balms, and other goodies outside of the US. She also runs great coupon codes frequently so read the shop announcements when you go there or check her out on Facebook page for coupon codes. This polish was bought by me and all opinions are my own.
Medusa Cascade is from "The Doctor is In" collection by LynBDesigns. Its a fabulous top coat and could even be a stand alone polish. This is newly formulated, and I never tried the old version so I don't know what the differences could be.
And check out that font on the bottle label. Yeah this fan girl approves.
The clear base is slightly blue tinted so it will tint whatever you layer it over. I got full coverage with 3 coats, so if you want an intense glitter bomb nail without the wait time of a base color, go for it.
I tried this layered over white and just plain and I really liked the pop the white gave it. It sort of makes the polish glow from within. I am sure it would look nice with a darker base as well. My base color is Orly's Dayglow which was marketed to make neons pop, and it does great under glitter toppers as well IMO. If you have tried this base coat and hate the streaks, you are using too thin of coats. Make them thicker and you will have less issues with streaks. And no, thinner doesn't solve that problem, its just really a white that wants to be put on thickly and left to dry fully. I did 3 min between coats first try though and then ruined the nails before pics when changing a diaper. The glitter was dry when I bumped it and it literally slid off the white. Do a full 5+ minutes for dry time for each layer of Dayglow. Just trust me on this.
And back to the sparkles.
This is 1 layer on the pinky and ring fingers, 2 layers on pointer and middle. The glitter does sort of want to do the dab technique application, so that is what I did for most of the fingers. The ring finger I actually just brushed it on though. Still a nice look, but I could see needing more coats for complete coverage if you do it this way.
The glitter died a little bumpy, but not gritty. Actually it dried about as bumpy as some glitters do WITH a generous top coat so I was really happy with it. A top coat made it completely smooth.
Click on the photos to zoom in. You know you want to see the rainbow holographic action going on. There are tiny glitters that are holographic as well as the bar glitters and some of the stars. There are silver rainbow holo stars and some dark blue stars that turn green to blue to purple. The light blue stars are matte.
This one has a bit of the color washed out because it was in the clouds. They have been rolling through all day and its been variations of sun and bright but no sun, and dim cloudy.
I love this color! Seriously. I tested out the polish for opacity and then reapplied it twice thanks to a diaper fiasco and I still don't want to take it off. I didn't even get annoyed that I had to apply it again because its so dang pretty. Oh and because I used a glue base coat so at least it was fast and easy between applications. I also admit after testing application on one fingernail I went back and bought more. What can I say, I really like them!
LynBDesigns nail polish retails for $8.50 including shipping to the US. Yes seriously! I believe she only sells polish within the states, but she sells lip balms, and other goodies outside of the US. She also runs great coupon codes frequently so read the shop announcements when you go there or check her out on Facebook page for coupon codes. This polish was bought by me and all opinions are my own.
Wednesday, October 24, 2012
DaringDigits Disco Diamond
| Daring Digits Diamond Disco |
And just to show how this polish wears I took a couple of photos late in the day of day 3 of the mani. Keep in mind I don't baby my hands.I washed dishes, cleaned up a few spills and even did some serious packing for a friend on day 1 of the mani. The 3rd day was also, you guessed it cloudy. Still nice, but not nearly as holographic.
| Daring Digits Diamond Disco on day 3 of wear |
And above is compared to the first day in full sun.
My only complaint, is easily fixed by me with better application. If any of the big diamonds are near the edge they are pokey. I did clean up on the middle nail and the corner of a diamond stuck out a little. It was catching on everything and rather annoying. Obviously not THAT annoying since i wore the polish for 3 days, but next tiem I wll make sure there aren't any diamonds on the top edge as well as the normal hanging off the end of the nail.
Daring Digits retails for $7.75 for full size and $4.25 for minis. You can find her on etsy! All polish was bought by me and all opinions are my own. And yes I do want to wear this again.
Wednesday, October 10, 2012
Rainbow Polish Cupcakes
I won a nail polish giveaway from Apple Laquer. Yay! And every single one is a brand I have never tried before. I don't usually like to branch out to new brands, especially pricey ones, because I have run into pricey polishes that are not worth it and indie polishes that suck. Not this time though!
Though clean up sucked and i wished I had started with an Elmer's glue base coat. Oh well, it did look really good on the polish I already had on. The pointer finger is Cupcakes alone, 3 layers. The rest are Cupcakes over Essie Mint Candy Apple with 1 layer on middle finger, 2 layers on ring finger, and 3 layers on pinky.
This is actually 2 days into the manicure because we all got sick over the weekend and I couldn't be bothered to take photos. I painted the nails Saturday evening and took photos Monday. It wore great! I do think a big part of that was the base coat (Zoya) and the top coat (OPI), but I am still pleased. I haven't had as long of wear with the OPI top coat with other colors so I think the polish itself is a factor.
This was packed with glitter. No fishing here. It did dry rather gritty feeling, but a nice layer of OPI top coat smoothed it out just fine. I did a rather thick layer especially on the nails with 3 layers of glitter.
I loved this polish from start to finish and now I want more.
Rainbow polish retails for $8.50 for a full size bottle and you can buy them at her store on BigCartel.
Though clean up sucked and i wished I had started with an Elmer's glue base coat. Oh well, it did look really good on the polish I already had on. The pointer finger is Cupcakes alone, 3 layers. The rest are Cupcakes over Essie Mint Candy Apple with 1 layer on middle finger, 2 layers on ring finger, and 3 layers on pinky.
This is actually 2 days into the manicure because we all got sick over the weekend and I couldn't be bothered to take photos. I painted the nails Saturday evening and took photos Monday. It wore great! I do think a big part of that was the base coat (Zoya) and the top coat (OPI), but I am still pleased. I haven't had as long of wear with the OPI top coat with other colors so I think the polish itself is a factor.
This was packed with glitter. No fishing here. It did dry rather gritty feeling, but a nice layer of OPI top coat smoothed it out just fine. I did a rather thick layer especially on the nails with 3 layers of glitter.
I loved this polish from start to finish and now I want more.
Rainbow polish retails for $8.50 for a full size bottle and you can buy them at her store on BigCartel.
Monday, September 24, 2012
Revlon Whimsical
A blog post a day? Ha, that won't happen until I don't have kids at home every day and/or no one is sick. But, I digress.
I am still learning how to take close up shots of nail polish. I am not very good at the photo aspect, and it makes me not want to post. But I decided I will post anyway, and eventually better photos will start happening.
This is Revlon Whimsical. I bought it in a blog sale. Its a blue tinted jelly with various sizes of small and micro glitters. The smallest glitter seems to be a holo shifting between blue and purple.
I am still learning how to take close up shots of nail polish. I am not very good at the photo aspect, and it makes me not want to post. But I decided I will post anyway, and eventually better photos will start happening.
This is Revlon Whimsical. I bought it in a blog sale. Its a blue tinted jelly with various sizes of small and micro glitters. The smallest glitter seems to be a holo shifting between blue and purple.
Indirect sun (shade)
Direct sun
Application was rather easy. This is 3 thin coats with a top coat. As you can see its very sheer. I wished I had used a solid base coat after the 3rd coat and how sheer it stayed. All in all, it was pretty and easy to use. Not really my color. It sort of makes my finger tips look slightly dead because of the color base tint. It makes me think emergency CPR is needed fingernails. So next time, I will layer it over a solid colored base, either a pink or blue since the larger glitters are pink and blue.
Location:
Lawrence, KS, USA
Subscribe to:
Posts (Atom)